Surfing 1x1
Everything you need to know before your first session — from reading the ocean to staying safe in the water.
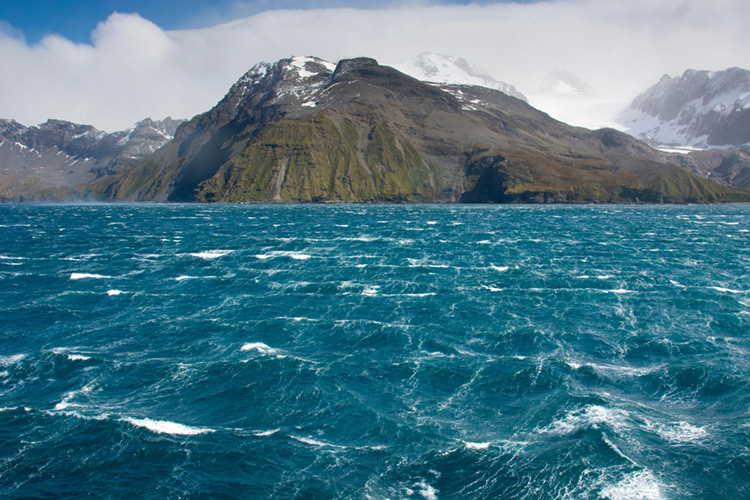
Wave Types
Understanding the difference between wave types is the first step to choosing the right destination. Each type has a distinct learning curve, danger level, and seasonality.

Beginner Beach Break
Waves breaking over shifting sandbars. The soft sandy bottom makes this the safest wave type for learning — wipeouts land on sand, not reef. Sandbars shift, so conditions change — but the soft landing means low risk.
Examples: Weligama (Sri Lanka), Kuta Beach (Bali), Hossegor (France), Tamarindo (Costa Rica)
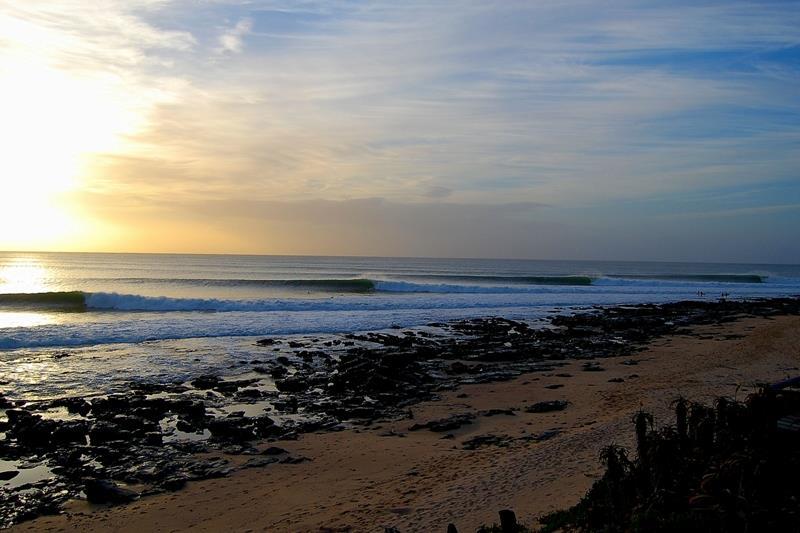
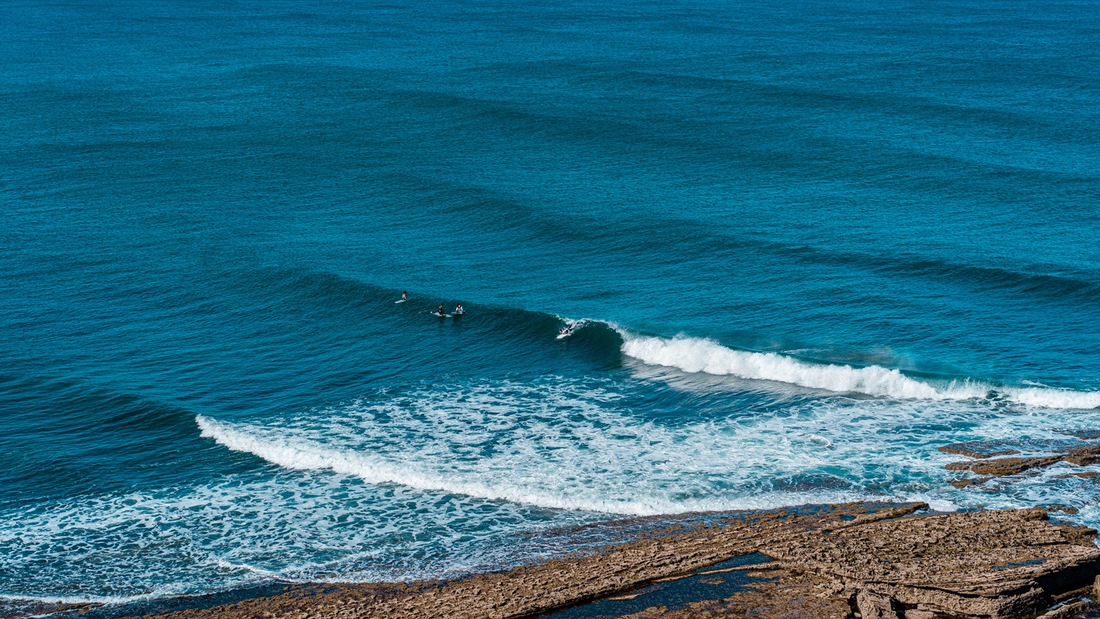
Intermediate Point Break
Waves peeling along a headland or rocky point. Long, predictable rides let you practice turns and read the ocean. Usually a single peak, so lineup positioning matters.
Examples: Jeffreys Bay (South Africa), Taghazout (Morocco), Raglan (New Zealand), Rincon (California)
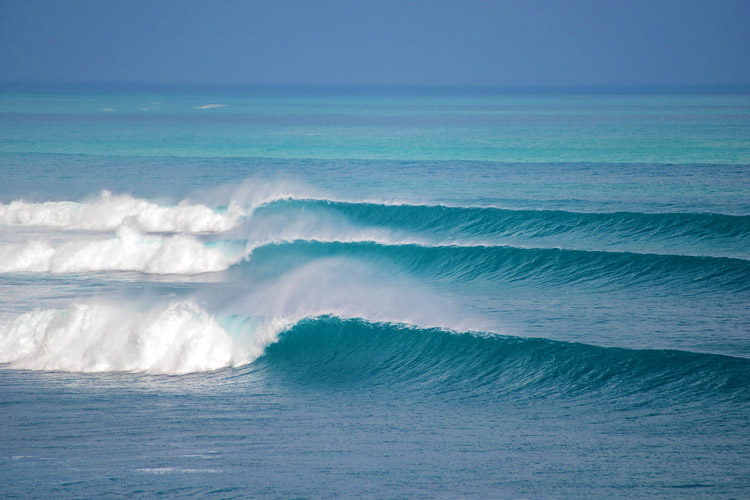
Advanced Reef Break
Waves breaking over coral or rock. Hollow, powerful, and consistent. The shallow reef creates barrels but also coral cuts and impact zones. Tide knowledge is critical.
Examples: Pipeline (Hawaii), Uluwatu (Bali), Cloud 9 (Philippines), Teahupo’o (Tahiti)
Ocean Safety for Beginners
The ocean is powerful and unpredictable. Understanding these basics before your first session will keep you safe and confident in the water.
⚠ Rip Currents — Know the Signs
Rip currents are narrow, fast-moving channels of water flowing away from shore. They’re the #1 danger for surfers and swimmers alike. They don’t pull you underwater — they pull you outward. The key is knowing what to look for and what to do.
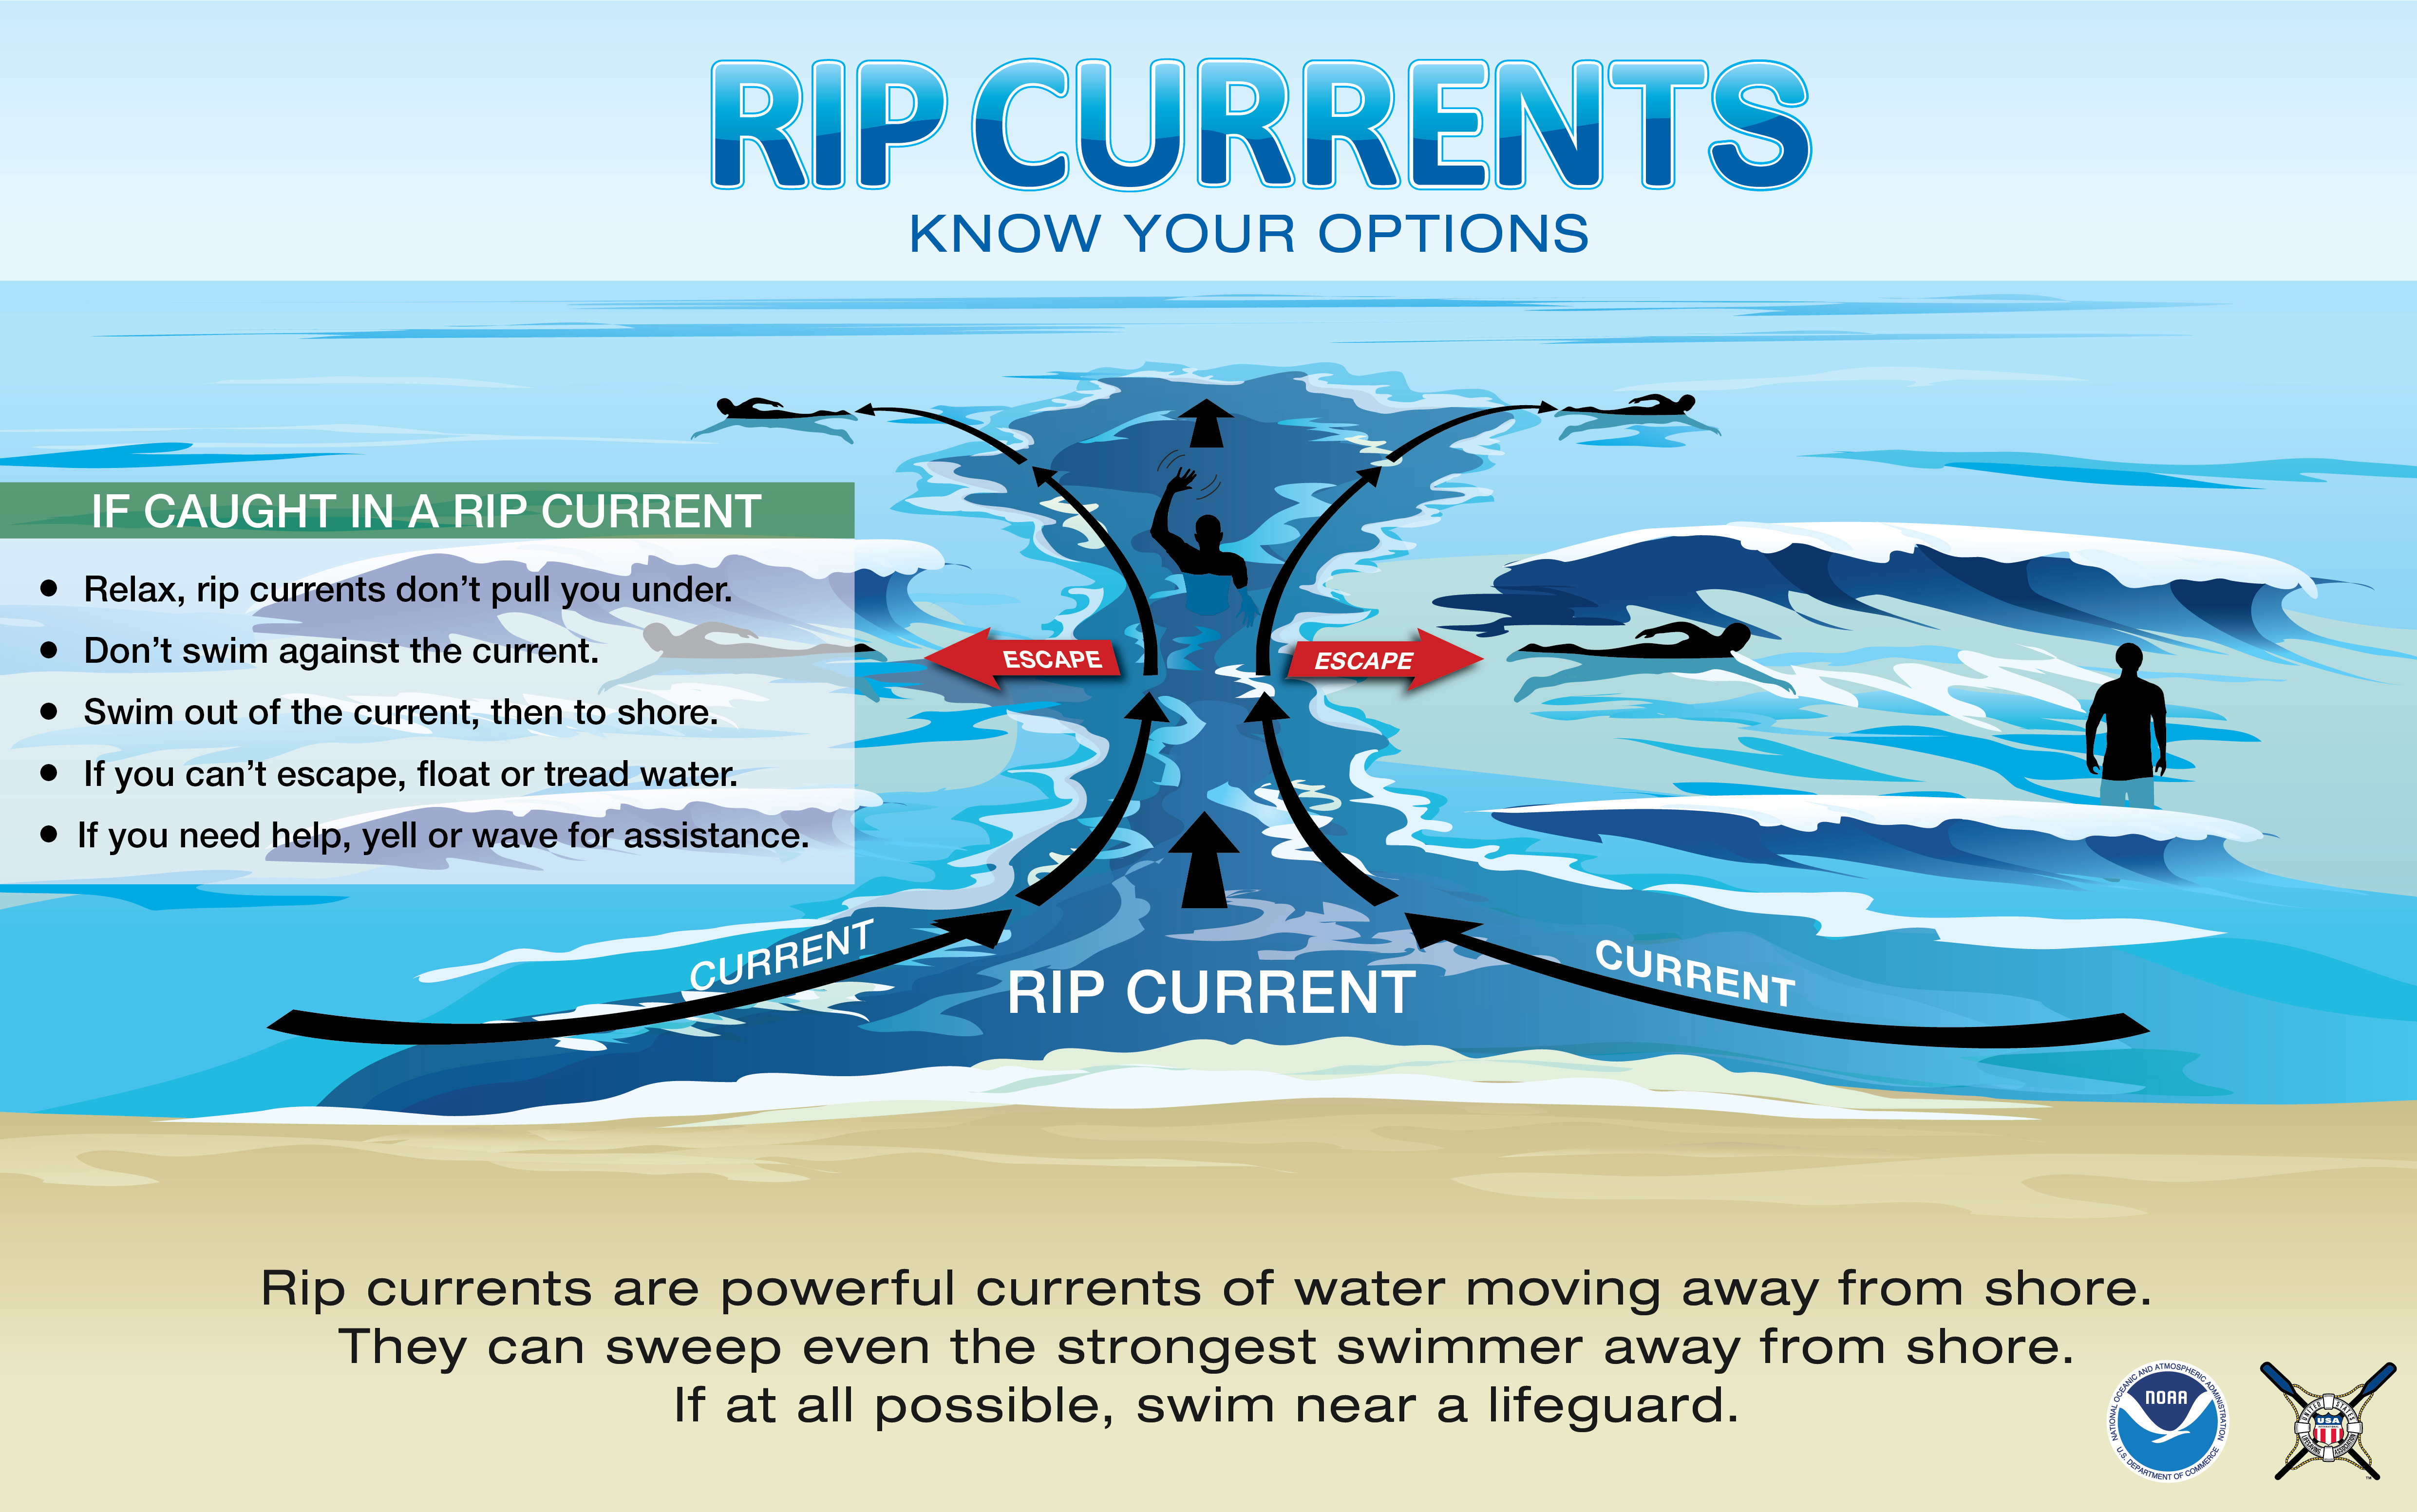
- Different-colored water: A channel of murky, sandy, or foamy water cutting through cleaner surf
- Gaps in the wave line: Waves breaking on both sides but not in a specific area
- Debris moving seaward: Seaweed, foam, or trash flowing steadily away from shore
- Channel of choppy water: An area where the surface looks rougher or more turbulent than surrounding water
- Don’t fight it. Swimming directly against the rip exhausts you. Rips flow at 1–2 m/s — faster than Olympic swimmers.
- Stay calm and float. Conserve energy. The rip won’t pull you under.
- Swim parallel to shore. Rips are narrow (10–30m wide). Swim 45° along the beach until you’re out of the current, then angle back to shore.
- Signal for help if exhausted. Raise one arm and wave. Lifeguards are trained for this.
- Float on your board if you have one. It’s a giant flotation device.
🔍 How Water Behaves Near You
The ocean isn’t random — it follows patterns. Learning to read these patterns turns a confusing wall of water into something you can predict and navigate. Pay attention to these three things during your first sessions and you’ll already be ahead of most beginners.
🌊 Incoming Sets
Waves arrive in groups of 3–7, then there’s a lull. Watch for 5 minutes before entering. The lull between sets is when you paddle out — not when you see a big set and rush in.
🌊 The Impact Zone
This is where waves break. It’s the most dangerous area. Don’t sit directly in it — paddle wide around it. If you wipe out, cover your head and stay under until the turbulence passes.
🌊 Currents Move in Circles
Water that flows out (rip) eventually flows back in (feeder current). Understanding this cycle helps you position yourself and predict where you’ll drift.
✅ What to Check Before Every Session
 ⚠️ Read the beach before you paddle out. Every surf spot has hidden hazards — submerged rocks, shallow reef, concrete pilings, or sandbars that shift with each storm. What looks like a clean, inviting wave from the shore can hide a rock shelf inches below the surface. Wipeout onto an unseen rock is one of the most common & preventable surfing injuries. Spend 5 minutes walking the beach, studying the water texture, and asking locals: “What’s underneath here?” That question could save you from a broken rib, a concussion, or worse.
Makes these checks automatic — they take 2 minutes and can save your life:
🌊 Common Beginner Mistakes
Almost every beginner makes these same mistakes. Knowing about them beforehand saves you frustration, wasted sessions, and potentially an injury.
❌ Wrong Board Size
Beginners grab shortboards because they look cool. Wrong. You need 8–9ft foam boards. Volume = floatation = more waves caught = faster learning. A 6ft board in beginner surf is like learning to drive in a Formula 1 car.
❌ Sitting Too Far Out
You paddle to where the experienced surfers sit. But they’re catching waves that break in 6ft of water — you need 3ft of whitewater. Sit closer to shore where waves have already broken. You’ll catch 10x more waves.
❌ Ignoring Tides
A spot that’s perfect at mid-tide can be a flat lake at high tide or a shallow reef hazard at low tide. Check tide charts. Ask locals. “What time is best?” is the most valuable question you can ask.
❌ Not Warming Up
Surfing uses muscles you don’t use in daily life. 5 minutes of stretching (shoulders, back, hips) prevents injury. Cold muscles + explosive pop-up = pulled hamstring = trip ruined.
How to Read a Surf Forecast
Before you book, check the forecast. Understanding three numbers tells you more about wave quality than any travel blog:
| Forecast Element | What It Means | What to Look For |
|---|---|---|
| Swell Height | The average height of waves in the swell. Not the same as wave face height at the beach — local bathymetry can double or halve it. | 1–3ft for beginners, 3–6ft intermediate, 6ft+ advanced |
| Swell Period | Time between wave crests (in seconds). Longer period = more energy = better waves. This is the most important number. | 8–10s = weak windswell, 12–15s = solid groundswell, 16s+ = powerful long-range swell |
| Swell Direction | Where the swell is coming from (compass bearing). A spot facing west won’t pick up an east swell, no matter how big it is. | Match to the spot’s exposure. Check surf-forecast.com for spot-specific charts. |
| Wind | Offshore (land to sea) = clean, groomed waves. Onshore (sea to land) = choppy, messy conditions. Cross-shore = somewhere in between. | Offshore is ideal. Anything under 10 knots offshore is clean. Over 15 knots onshore = blown out. |
⛰ Offshore Wind (Good)
- Wind blowing from land out to sea
- Grooms the wave face smooth and clean
- Creates hollower, more powerful barrels
- Usually happens in the early morning or evening
- Best example: Bali’s Uluwatu at dawn
🌀 Onshore Wind (Bad)
- Wind blowing from sea toward land
- Makes the wave face bumpy and crumbling
- Waves close out rather than barrel
- Usually picks up in the afternoon as land heats up
- Still surfable — just less fun and more tiring
Understanding Swells & When to Go
Every surf trip lives or dies by one thing: the swell. Not all waves are created equal — understanding what makes a swell good, and when those swells arrive at your chosen destination, is the single most valuable skill a travelling surfer can develop.
What Is a Swell?
A swell is a series of waves generated by distant storms, often thousands of kilometres away. Unlike the choppy, disorganised waves created by local wind, swells travel across open ocean in clean, evenly spaced lines — organising themselves into the smooth, powerful sets that surfers chase.
When you check a surf forecast, you’ll see three critical numbers:
📏 Swell Height
The average height of the waves out at sea, not the size they break on the beach. A 1.5m swell might produce 1m waves at a shallow beach or 3m waves at a steep reef. Height alone tells you nothing — you must combine it with period and spot knowledge.
⏱ Swell Period
The time (in seconds) between one wave crest and the next. This is the single most important number on a surf forecast. Long period = more energy, more power, better waves. A 1m swell at 15 seconds will produce far better surf than a 2m swell at 7 seconds.
🌎 Swell Direction
The compass angle from which the swell approaches. Every surf spot has a “swell window” — the range of directions that produce waves there. A west-facing beach will miss east swells entirely, no matter how big they are.
Period Is Everything
Most beginners focus on swell height. Experienced surfers look at period. Here’s why:
| Period (seconds) | What It Means | Best For |
|---|---|---|
| 5 – 8s | Wind swell. Weak, choppy, disorganised. Waves lack power and shape. | Whitewater practice only |
| 9 – 12s | Medium swell. More organised, moderate power. Good wave shape at beach breaks. | Beginners & intermediates |
| 13 – 16s | Groundswell. Powerful, clean, well-spaced waves. Fast and hollow at reef/point breaks. | Intermediate & advanced |
| 17s+ | Long-period groundswell. Extremely powerful. Waves grow significantly in shallow water. Expert conditions. | Advanced & big-wave only |
Groundswell vs Windswell
🌊 Groundswell (Long-Period)
- Generated by distant storms (1,000+ km away)
- Period: 13+ seconds
- Waves arrive in clean, organised sets
- More power, faster, hollow barrels
- Energy extends deep — interacts with ocean floor
- This is what you want for surfing
🌀 Windswell (Short-Period)
- Generated by local or nearby winds
- Period: under 10 seconds
- Waves are choppy, irregular, close together
- Weak, mushy, hard to generate speed
- Energy only near surface — dissipates quickly
- Good for whitewater practice only
What Swell Size Should You Aim For?
| Skill Level | Comfortable Swell | Ideal Period | What to Expect |
|---|---|---|---|
| Beginner | 0.3 – 1m | 8 – 12s | Whitewater and small green waves. Gentle, forgiving, easy to paddle. |
| Intermediate | 1 – 2m | 10 – 14s | Clean, well-shaped waves. Enough power for turns and barrels at good spots. |
| Advanced | 2m+ | 12 – 18s | Fast, hollow, powerful waves. Heavy reef breaks, big-wave spots. |
Seasonal Swell Calendar
Swells follow seasons because storms follow seasons. Use this calendar to plan when — and where — to go:
| Months | Best Destinations | Swell Direction | Water Temp |
|---|---|---|---|
| Jan – Mar | Indonesia (tail end), Australia, Hawaii, Sri Lanka | NW Pacific, SW Indian | 26–30°C |
| Apr – Jun | Indonesia opens, Maldives, Morocco, Portugal | SW Indian, NW Atlantic | 27–30°C |
| Jul – Sep | Morocco peak, France, Ireland, Philippines, South Africa | NW Atlantic, SW Pacific | 18–28°C |
| Oct – Dec | Hawaii big-wave season, Portugal winter swells, Morocco, Indonesia shoulder | NW Pacific, NW Atlantic | 22–29°C |
Northern vs Southern Hemisphere
When one hemisphere is flat, the other is pumping. Understanding this is the key to year-round surf travel:
🌡 Northern Hemisphere (Oct–Mar)
- Hawaii: big-wave season (Pipe, Sunset)
- Portugal: winter swells, massive waves
- Morocco: consistent NW Atlantic swells
- France: heavy barrels, cold water
- California: winter swell season
- Philippines: typhoon season swells
🌞 Southern Hemisphere (Apr–Sep)
- Indonesia: peak season, consistent swell
- Australia: autumn/winter power swells
- New Zealand: cold but powerful
- South Africa: winter swell window
- Tahiti: southern hemisphere winter swells
- Brazil: consistent south swells
How to Read a Surf Forecast
Before booking any trip, learn to read a forecast. Here’s the 6-step process that tells you more about wave quality than any travel blog:
Check Swell Period First
If it’s under 10 seconds, conditions will be messy regardless of height. Look for 12s+ for quality surf.
Match Swell Direction to Spot Exposure
Every spot has an optimal swell direction. A west-facing beach misses east swells. Research the spot’s “swell window” before committing.
Wind Direction Matters as Much as Swell
Offshore (land to sea) holds waves up and creates clean barrels. Onshore (sea to land) crumbles them into chop. Cross-shore is a middle ground.
Check the Tide
Some spots are only good at mid-tide. A reef break at low tide can be dangerously shallow. Use tideschart.com or a local app.
Look at the 7–14 Day Forecast
Don’t just look at today. Swell windows can shift by a few days. Book flexible flights and accommodation so you can chase the best window.
Cross-Reference Two Sources
Surfline, Windy.com, and surf-forecast.com often disagree. Use at least two to build a reliable picture.
Surf Camps vs DIY
The two main approaches to surf travel: a structured camp that handles everything, or a self-arranged trip where you call the shots. Neither is better — it depends on your level, budget, and travel style.
| Factor | Surf Camp | DIY |
|---|---|---|
| Cost | $300 – $1,500 / week (all-inclusive) | $20 – $80 / day (self-arranged) |
| Lessons | Included (3–5x / week) | Find local schools yourself |
| Accommodation | Pre-arranged, often beachfront | Your choice, more flexibility |
| Social | Built-in community | You build your own |
| Skill progression | Structured coaching | Self-directed |
| Best for | Beginners, solo travelers | Experienced surfers, groups |
Which Option Is Right for You?
🏫 Choose a Surf Camp If…
- You’re a beginner (or close to it)
- You’re traveling solo and want company
- You don’t want to plan logistics
- You want structured coaching
- You prefer a set daily routine
- It’s your first surf trip ever
🚦 Go DIY If…
- You’re intermediate or above
- You like flexibility and spontaneity
- You’re on a tight budget
- You’re traveling with surf-savvy friends
- You want to choose your own break each day
- You’ve done surf trips before
Red Flags When Booking a Surf Camp
Not all surf camps are created equal. Watch for these warning signs:
- No mention of instructor qualifications. Legitimate camps list ISA, SLSA, or local certifications. If they don’t mention credentials, ask.
- “All levels” with no separation. A beginner sharing a session with an advanced surfer means neither gets proper attention. Good camps separate by skill level.
- Old or damaged boards. Inspect the quiver before booking. Dinged, waterlogged boards are uncomfortable and potentially unsafe.
- No safety equipment. First aid kits, communication devices, and knowledge of local emergency services should be standard.
- Hidden costs. Some “all-inclusive” camps charge extra for board rental, wetsuits, airport transfers, or certain meals. Get the full price in writing.
- No reviews or testimonials. If you can’t find independent reviews on Google, TripAdvisor, or surf forums, proceed with caution.
Packing Checklist
Packing for a surf trip is a balancing act: enough gear to be functional, not so much that you’re paying overweight baggage fees. Here’s what matters.
Surf Gear
Travel Essentials
What Board to Bring Where
Your board choice can make or break a trip. Here’s a quick guide for matching your quiver to the destination:
| Destination Type | Ideal Board | Why |
|---|---|---|
| Tropical beach break | Shortboard or fish | Warm water, fast waves, smaller surf. A fish adds fun in smaller conditions. |
| Tropical reef break | Shortboard + step-up | Reef waves are more powerful and hollow. A step-up handles bigger days. |
| Cold-water point break | Shortboard + longboard | Longboard for smaller days, shortboard when it’s firing. Wetsuit required. |
| Beginner beach break | Longboard or foamie | Catches more waves, more stable, more fun. Don’t bring your performance shortboard. |
| Remote boat trip | 2–3 boards | Bring a daily driver, step-up, and maybe a fish. No surf shops on the boat. |
Surf Insurance
Standard travel insurance often excludes surfing. If you break your leg on a reef in Bali and need emergency evacuation to Singapore, a standard policy may leave you with a $50,000+ bill. Always verify your coverage before you fly.
| Coverage | Standard Policy | Surf-Specific Policy |
|---|---|---|
| Trip cancellation | ✓ Included | ✓ Included |
| Medical emergencies | ✓ Included | ✓ Included |
| Surfing injuries | ✗ Often excluded | ✓ Covered |
| Surfboard damage / loss | ✗ Limited or excluded | ✓ Covered (per-item limits apply) |
| Evacuation from remote spots | ✗ May not apply | ✓ Covered (air ambulance) |
| Big wave / competition surfing | ✗ Excluded | ⚠ Check policy wording |
| Cost | 4–10% of trip cost | 4–12% of trip cost |
How to Choose the Right Policy
Not all surf insurance is created equal. The right policy depends on your trip type, destination, and how much gear you’re carrying. Here’s what to prioritise:
Confirm Surfing Is Named
The single most important check. Many policies exclude “water sports” broadly. Read the activity schedule, not the brochure. If surfing isn’t explicitly listed as covered, you’re uninsured.
Check Medical Evacuation Limits
Air ambulance from the Mentawai Islands to Singapore can cost $50,000–$100,000+. From remote Morocco, helicopter evac to a trauma centre runs $15,000–$30,000. Your policy needs evacuation coverage of at least $100,000, ideally $250,000+.
Verify Board Coverage Limits
Most policies cap per-item coverage at $500–$1,000. If you’re travelling with a $800 custom board, that may not be enough. Some providers let you increase equipment coverage for an extra premium.
Read the Exclusions
Most policies exclude: competition surfing, big-wave surfing (typically 20ft+), tow-in surfing, and spearfishing. If your trip involves any of these, you need an adventure-sports endorsement.
Buy Within 14–21 Days of First Payment
Most providers offer maximum benefits (including pre-existing condition waivers and higher cancellation limits) only if you buy within 14–21 days of your first trip deposit. Buy early.
Provider Comparison
Here are the most popular options for surf travellers, with real coverage limits and pricing:
| Provider | Medical | Evacuation | Board Coverage | Price (1 week) | Best For |
|---|---|---|---|---|---|
| World Nomads Standard | $125,000 | $400,000 | $500/item ($1K max) | ~$90 | Surfers wanting comprehensive adventure coverage |
| World Nomads Explorer | $125,000 | $400,000 | $1,000/item | ~$155 | Higher board value, more gear |
| World Nomads Epic | $125,000 | $400,000 | $2,000/item | ~$287 | Custom boards, extended trips |
| SafetyWing Essential | $250,000 | $100,000 | $500/item ($3K total) | ~$45 | Budget travellers, nomads, flexible trips |
| SportsCover Direct | £10M | £10M | Up to £2,500 | ~£25 | UK residents, specialist surf coverage |
| SOVENTURE | $250,000 | $500,000 | $1,000/item | ~$70 | Adventure-focused, higher evacuation limits |
What a Claim Actually Looks Like
Understanding the claims process before you need it saves stress when things go wrong. Here’s the typical process:
Get Treatment First
Your health comes first. Get to a hospital or clinic, get treated, and keep every document they give you: medical reports, receipts, prescriptions, X-rays, and discharge papers.
Document Everything
Photograph your board damage before and after repair. Get a police report for theft. Keep airline receipts for delayed luggage. Save all correspondence with airlines, hotels, and medical providers.
File Within 24–72 Hours
Most providers require claims to be filed within 24–72 hours of the incident. World Nomads and SafetyWing both have online portals. SafetyWing’s redesigned process now averages 7–10 business days for resolution.
Submit Documentation
Upload: medical reports, receipts (originals), photos of damage, police reports (for theft), proof of ownership for boards (receipts, photos with timestamps), and any correspondence with third parties.
Real-World Costs: What Emergencies Actually Cost
These aren’t hypotheticals — they’re based on real claims and industry data:
| Emergency | Location | Typical Cost (Without Insurance) |
|---|---|---|
| Reef cut + infection treatment | Bali, Indonesia | $500 – $2,000 |
| Broken leg (surgery + hospital) | Morocco | $3,000 – $8,000 |
| Helicopter evacuation to trauma centre | Remote Portugal | $15,000 – $30,000 |
| Air ambulance: Mentawai → Singapore | Indonesia | $50,000 – $100,000 |
| Hyperbaric chamber treatment (decompression) | Various | $5,000 – $15,000 |
| Board replacement (airline damage) | Any destination | $400 – $1,200 |
| Coral cut + stitches + antibiotics | Indonesia | $200 – $800 |
📋 Quick Checklist Before You Buy
- Is surfing explicitly named as a covered activity? Not just “water sports” — surfing specifically.
- What’s the medical evacuation limit? At least $100,000 for remote destinations, $250K+ for Mentawai/Pacific islands.
- What’s the per-item board limit? $500 won’t cover a custom shortboard. Check if you can increase it.
- Does it cover big-wave surfing? Many policies exclude waves over a certain height. Check the fine print.
- Can you buy after departure? Useful if your trip extends or you forgot. World Nomads and SafetyWing allow this.
- What’s the claims turnaround? SafetyWing now averages 7–10 business days. World Nomads: 10–15 business days.
- Does it cover board rental if yours is delayed? Some policies reimburse rental costs while you wait for your board.
Etiquette & Safety
Surf etiquette isn’t optional — it’s what keeps the lineup safe and enjoyable for everyone. Breaking the rules can get you yelled at, punched, or banned from a break. Respect the code.
🏯 The Rules of the Lineup
- Right of way — the surfer closest to the peak (where the wave first breaks) has priority. Period.
- Don’t drop in — cutting off another surfer’s wave is the cardinal sin of surfing. It’s dangerous and disrespectful.
- Paddle wide — don’t paddle through the lineup where people are riding. Go around the break, not through it.
- Hold your board — never ditch your board when a set comes. It becomes a projectile that can hit someone behind you.
- Respect locals — you’re a guest in their lineup. Follow local norms, don’t crowd the best locals, and smile.
- Communicate — call your wave (“My left!”) when the peak is ambiguous. A quick shout prevents collisions.
- Know your limits — if the waves look too big from the beach, they probably are. Sit out and watch — the ocean will be there tomorrow.
Reef Safety
Reef breaks are where surfing gets serious. The waves are better, but the consequences of a mistake are real. Follow these rules and you’ll surf reefs confidently.
- Check the tide — many reef breaks are only surfable at specific tides. Too low = bone-deep impact zone.
- Find the channel — before paddling out, identify the safe exit route (usually a deeper section where whitewater doesn’t push you onto the reef).
- Sea urchins — common on reef breaks in Indonesia, Philippines, and Hawaii. Reef booties are non-negotiable.
- Coral cuts — clean immediately with fresh water and antiseptic. Coral contains bacteria that cause infections within hours in tropical water.
If Something Goes Wrong
Even experienced surfers get into trouble. What separates a scary moment from a dangerous one is how you react. Stay calm, follow these steps, and you’ll get through it.
- Stay calm. Panic wastes energy and makes the situation worse.
- Protect your head. In a wipeout, cover your head with your arms to avoid reef impact.
- Find your board. Your board is your flotation device. Hold on to it.
- Signal for help. Wave your arm if you need assistance. Other surfers will help.
- Treat reef cuts immediately. Rinse with fresh water, apply antiseptic, cover with a waterproof plaster. Seek medical attention for deep cuts.
Local Surf Culture: What to Know
Surf etiquette is universal, but local customs vary. Understanding the unwritten rules of a new lineup shows respect and prevents conflict. Here’s what to know in the world’s most popular surf regions:
🇳🇹 Southeast Asia (Bali, Philippines, Sri Lanka)
- Respect temple areas near surf spots (Uluwatu, Padang)
- Don’t surf during religious ceremonies
- Locals often have priority at their home break
- Bargaining is expected for board rental — but not aggressively
- Remove shoes when entering surf shops in villages
🇪🇺 Europe (Portugal, France, Morocco)
- Queuing is less formal but respect exists
- French beach breaks can get very crowded in summer
- Morocco: dress modestly outside the water
- Portuguese locals appreciate basic Portuguese phrases
- French surfers value politeness in the lineup
Heading to the Americas or the Pacific? The culture shifts — here’s what to expect:
🇺🇳 Hawaii & Pacific
- Locals have strict priority — respect it absolutely
- Don’t drop in. Ever. The consequences are real
- Learn Hawaiian surf terms (e.g., “chee-hoo” for stoke)
- Remove fins from your board when walking through parking areas
- Some breaks have “locals only” days — respect them
🇧🇷 Central America (Costa Rica, Mexico, Nicaragua)
- “Pura Vida” philosophy — relax, don’t rush
- Beach vendors are part of the culture — be friendly
- Tipping is appreciated and often expected
- Don’t leave valuables on the beach (even briefly)
- Learn basic Spanish — locals appreciate the effort
Best Destinations — Beginners
Your First Waves
Sandy bottoms, gentle whitewater, and surf schools within walking distance. These destinations are chosen for wave consistency, safety, and the infrastructure to help you progress.


What to Expect in Your First Week
Realistic expectations prevent disappointment. Here’s what a typical first week of surf travel looks like for a total beginner:
🔥 Days 1–2
- Learning to pop up on the sand first
- Catching whitewater (broken waves) only
- Arms will be exhausted after 1 hour
- You’ll fall off the board 50+ times
- Expect to be sore everywhere you didn’t know existed
🌊 Days 3–5
- Pop-up starts to click (sometimes)
- Catching 10–15 waves per session
- Starting to read the ocean a little
- Can paddle back out without help
- First moments of riding straight on the board
Best Destinations — Intermediate
Riding the Line
You can pop up consistently and start turning. These destinations offer more challenging waves that will push your surfing forward — reef breaks with defined sections, point breaks with long walls, and beach breaks with more power.


Moving from Beginner to Intermediate
The intermediate stage is the longest “plateau” in surfing. You can catch waves consistently but struggle with turns, positioning, and reading the ocean. Here’s what accelerates the leap:
- Surf different breaks, not just your favourite. Each wave type teaches a different skill. Beach breaks teach you to read shifting sandbars. Point breaks teach you to trim along a wall. Reef breaks teach you to commit to the drop. A week bouncing between break types accelerates progress faster than a month at one spot.
- Watch more than you surf. Spend 20 minutes watching the lineup before paddling out. Notice where the best surfers sit, how they position for waves, and where they exit. The ocean is the classroom — observation is free.
- Film yourself. A $30 waterproof phone case and a friend on the beach reveal everything. You’ll immediately see timing issues, balance problems, and missed waves that you can’t feel in the water.
- Work on your paddle fitness. The biggest limiter at intermediate level isn’t skill — it’s paddle endurance. Stronger paddling means more waves, less fatigue, and faster recovery between sets. Swim laps or use a resistance band before your trip.
- Learn to bottom turn. The bottom turn is the foundation of every manoeuvre. It converts the wave’s energy into speed. Without it, you’re just riding straight. Focus on this one turn and everything else opens up.
Best Destinations — Advanced
Chasing Barrels
Hollow reef breaks, heavy barrels, and waves that demand respect. These are the spots that separate good surfers from great ones. Reef knowledge, tide awareness, and a solid duck-dive are non-negotiable.


Preparing for Advanced Waves
Advanced surf spots aren’t just bigger versions of beginner waves — they’re fundamentally different environments. Reef knowledge, mental preparation, and the right gear are non-negotiable.
💪 Physical Preparation
- Paddle 3–4x per week for 6+ weeks before
- Swim laps to build breath-hold capacity
- Practice duck-diving in the pool
- Build core strength for stability on steep drops
- Surf heavier waves at home first
🛡 Essential Gear
- Reef booties (non-negotiable for coral)
- Surf helmet for shallow reef breaks
- Step-up board for bigger days
- Extra-strength leash (7mm minimum)
- Wax appropriate for water temperature
Top 10 Surf Spots in the World
These are the waves that define surfing. Every one of them has shaped the sport’s history, hosted legendary competitions, or produced the kind of waves that surfers travel across the globe to experience. This isn’t a “best of” list — it’s a bucket list.


Surfing in Australia
Australia is surfing’s spiritual home outside Hawaii. With over 25,000km of coastline, consistent swells year-round, and a surf culture woven into national identity, this is where the sport thrives at every level. From beginner-friendly beach breaks to the world’s most dangerous big-wave spots, Australia has it all.
New South Wales


Queensland


Western Australia


Surfing in Portugal
Portugal is Europe’s surf capital. With 1,794km of Atlantic-facing coastline, consistent swells from September to April, and a range of breaks from mellow beach waves to world-class reef, this is where the continent comes to surf. The country’s compact size means you can score multiple spots in a single day.
Ericeira & Central Coast


Peniche & Silver Coast


The Algarve
Surfing in Indonesia
Indonesia is surfing’s promised land. With 17,000 islands, warm water year-round, and the most consistent swell on the planet, this archipelago produces more world-class waves than any other country. From Bali’s accessible reef breaks to the remote Mentawai charters, Indonesia is where surfers go to level up.
Bali


Lombok & East Java
Mentawai Islands
Surfing in Hawaii
Hawaii is where surfing was born. The ancient Hawaiians called it he’e nalu — wave sliding — and it was a sacred practice reserved for royalty. Today, Hawaii remains the spiritual home of surfing, with the most powerful, dangerous, and iconic waves on the planet. From beginner-friendly longboard waves to the 50ft monsters of the North Shore, Hawaii has it all.
Oahu — The North Shore


Oahu — South Shore & Other Islands


Surfing in the USA
The USA is where modern surf culture was built. California’s beaches gave birth to the surf industry, Hawaii launched the sport globally, and the East Coast offers surprising consistency. From the mellow point breaks of Malibu to the big-wave monsters of Mavericks, the USA has every type of surf experience.
Southern California


Northern California


East Coast & Gulf

